
Navigate
Products
Download
eShop
Upgrade
Overview
Training
Support

Navigate
Products
Download
eShop
Upgrade
About
Training
Support
This chapter is an overview of various methods of creation of thin hairline outlines. These methods are described in more detail in respective tutorials.

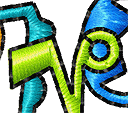
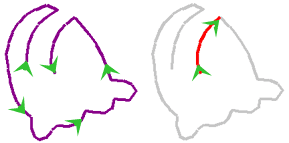
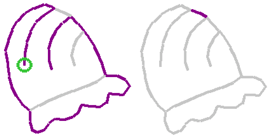
Thin outlines like shown on above picture are used very often for lettering, logos and cartoon-like motives. One of the key rules in embroidery is to make lowest possible number of trims. Therefore, the best way of how to make such outlines is to digitize it as a single, continuous path of stitches. To avoid trims, some parts have to be stitched two times: there (forward path) and back (backward path). In fact, the whole outline, regardless of it complexity, can be created so that each of its parts (elements) is stitched two times. The end point of outline is identical with the start point. Such outline is called a double-layered outline in Studio.
Stitches (animation).
Each element has two layers of stitches to get there and back.
Backward paths
are drawn in red color for clarity.
Outline elements in Object Inspector.
Backward Paths ![]() are marked with arrows.
are marked with arrows.
Sewing is continuous, there are no
trims.
There are several ways of how to create double-layered outline in Studio. They differ in amount of automation used in each approach. Some digitizers prefer one particular way of outlining. The most convenient approach is to use fully automatic outlines. In some cases, however, it is necessary to use manual or semi-automatic approach. For example, when you want to combine thin outline with column (an eye with outline), it is necessary to use manual digitizing.
Manual digitizing of all elements, including backward paths in proper order. Proper order is necessary to ensure continuous sewing. This method is not recommended and is mentioned here only for sake of completeness.
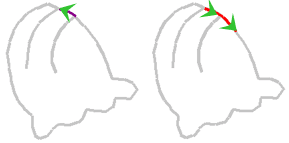
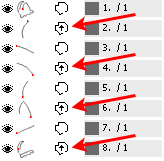
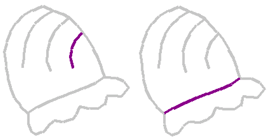
Order of elements 1-4. Purple and red color denote current
element.
Purple element is first layer of stitching. Red element is second layer.
Order of elements 5-8.
Please note that end point of element 8 is identical to start point of element
1.
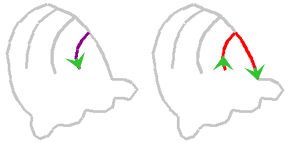
Manual digitizing with use of main menu > Transform > Create Backward Path command. Backward path elements are identical with forward path, they are only sewn in reversed order. Therefore, they can be easily generated by program. The proper order of elements is still necessary in this approach. Use this method if you need to create small outlines combined with other objects.
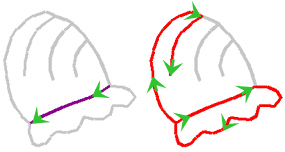
Semi-automatic method: manual digitizing of forward elements in any order and their automatic arrangement with use of main menu > Transform > Arrange Outline Parts command. Elements can intersect one another. Elements can be digitizing in any order. For best accuracy, pay attention to places where elements connect one to another. Program splits and sorts elements to achieve proper order and creates all the backward paths. The start point of the first element remains the start point of the whole outline. As outline is double-layered, it is also the end point of the outline. If some elements form separate object (like dot on i) or are too far from other elements, program creates connection to such elements so that complete outline is a single object. If you want to preserve separate objects, use Arrange Outline Parts (no Connections) command instead.
Elements 1-4. Order of elements is not significant in this
case.
Start and and end point of the outline is identical with first node of the
first element (green circle).
It is important to avoid duplicate edges and to align end points of individual
edges.

Arranged elements are combined into larger segments to optimize stitches layout. If you want to preserve original elements for easier editing, switch off this feature in Parameters window > Whole Design > Main tab.
When compared to method 1, there is about 50% less elements to digitize (no backward paths). Order of elements is not significant and there is no need to remember which part already has second layer of stitching.
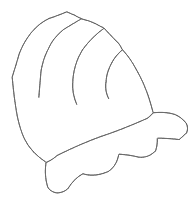
Above illustrations depict the order and layout of outline elements. The actual elements are created with curves, lines and nodes like shown on the left side picture.
Use this semi-automatic method for complex outlines when you cannot use automatic method 4.
Automatic creation of outlines from fill and column objects. All that user has to do is to select objects to be outlined and use the main menu > Transform > Auto Outliner command. This approach is recommended to use whenever possible.
If there are fill or column objects with identical edges (adjoining areas without overlay), the automatic outlining can fail. This case typically occurs when working with vector objects imported from graphic files (EMF, WMF, CMX). In such a case, edit adjoining edges (move one edge to create an overlay) or use another method of outlining.
The most commonly used methods are 3 and 4.
Please note: forward and backward paths are marked with special icons ![]() and
and ![]() in the object inspector. These icons help to identify respective elements for selection and
editing. Also, there is a special command in main menu > Select > Outlines >
Backward Paths to select backward paths quickly. Then it is possible to set satin stitches to these elements or
make whatever editing is needed.
in the object inspector. These icons help to identify respective elements for selection and
editing. Also, there is a special command in main menu > Select > Outlines >
Backward Paths to select backward paths quickly. Then it is possible to set satin stitches to these elements or
make whatever editing is needed.