Embroidery design in Studio consists of objects in a vector form. Studio allows to create vector
objects manually node-by-node, or semi-automatically with Freehand Tool,
Trace Tool and import them from a graphic vector
files. This chapter deals with node-by-node manual digitizing (vectorization) of objects.
Object with 1 edge (Fill, Outline, Connection)
The simpliest object in Studio contains just one edge, which is series of straight line or curve
elements. Some object types require "closed" edge, which means that its first point and its last point must
have identical position. To create object with one edge (like Outline, for example), follow these steps:
1.
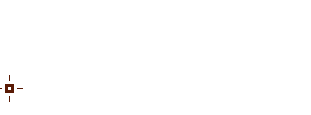
Click on the Outline Tool button in the tool bar at the left side of the screen. This will switch Studio into creation/editing mode.
2.
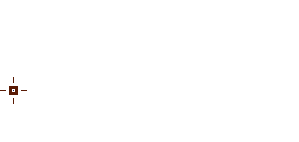
Click on the work area to place the first node of the object. The first node is marked by a hairline cross.
3.
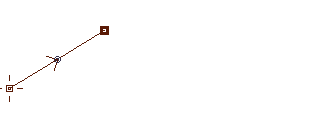
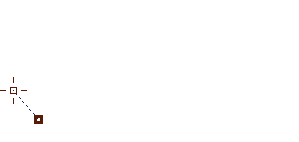
Click on the other place to create second node. Note that focused node is displayed with thick border. Element connecting the 1st and 2nd node is straight, but is is a curve, because it has middle node (small circle). Arrow indicates the orientation of nodes.
4.
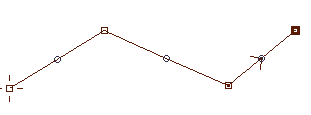
Add another two nodes. If you need to edit position of any node, select it by clicking on it and drag it to a new position with left mouse button depressed.
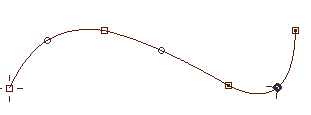
All elements between nodes are straight. Now we will arch them to create smooth curve.
5.
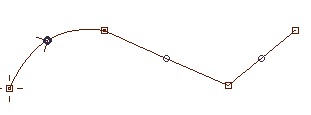
Click on the middle (circular) node of the first element to select it. Hold left mouse button depressed and move node to a new position. This will make a curve from the straight line.
6.
Select and move rest of the middle nodes until the whole object is smooth.
7.
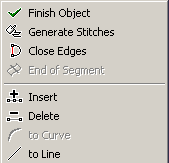
Now you can click the right mouse button to invoke the pop-up menu for finishing object and/or generating stitches. We have created an Outline object, which does not need to be closed. Objects like Fill, Opening or Sfumato must be closed. To close object, use Close Edges command from the pop-up menu.
The pop-up menu contains also commands for insertion/deleting of nodes, conversion of elements to
straight lines or curves and several other commands specific for created object. Most of these functions are also
accessible with buttons in the horizontal button bar the top of the screen.
Another functions are accessible via main menu>Nodes. These functions include reversing the nodes
order and options to snap nodes to grid lines, guide lines, other nodes, work area edges and other object edges.
Object with 2 edges (Column, Column with Pattern, Applique)
Objects with 2 edges are filled with stitches running from one edge to the other at variable angle.
This type of objects is used for satin stitch and applique. To create object with 2 edges, follow these steps:
1.
Click on the Column Tool button in the tool bar at the left side of the screen. This will switch Studio into creation/editing mode.
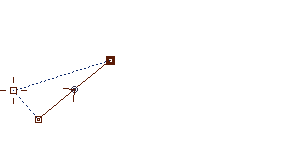
2.
Click on the work area to place the first node of the object. The first node is marked by a hairline cross.
3.
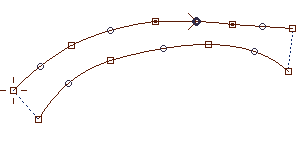
Click on another place to create a base of the column object. Note that focused node is displayed with thick border. The base is displayed as a dashed line. Both edges will start in this base and end in another base at the opposite end of the column. Basis are always straight lines and they define angle of stitches at beginning and end of the column. Angle of stitches in between is interpolated from these two basis.
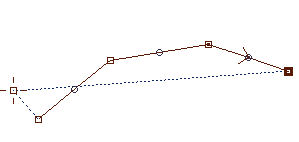
4.
Create a new node by clicking on the work area. This is the first element of the edge. Arrow indicates the orientation of nodes.
5.
Create several other nodes of the first edge.
6.
Now select the node at the other side of the base. This is an important step, because program now knows that the next nodes will be added to the second side.
7.
Repeated clicking on the work area will create nodes belonging to the second edge.
8.
Both edges are composed of the straight lines elements. Middle nodes of curves (which are straight now) are displayed as a small circles.
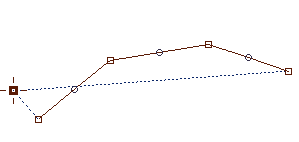
9.
Select and move middle nodes to make both edges smooth. Hold left mouse button depressed and move node to a new position. This method can be used for adjustment of any node position, not just the middle node.
Thread will start filling the column on a place where the first node (with cross) is located. The sewing will end at the last node on the second side. If you need to change sides of the column, use main menu>Nodes>Swap Edges command.
10.
Click right mouse button anywhere on the work area to invoke the pop-up menu. Select Generate Stitches from this menu. This will finish the creation/editing mode and fill new object with stitches. If you do not want to fill it with stitches now, use the Finish Object command instead.
11.
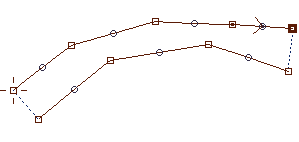
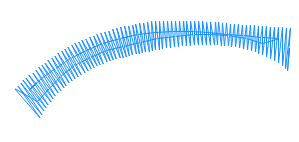
Finished column object has stitches running in a zig-zag way from the start base to the end base, which define range of angles of the stitches. Basis may be not sufficient to define angle of stitches of a more complex column. In such a case, use End of Segment command from the pop-up menu to define angle inside of column. This command will connect selected node with a nearest node on the other side and thus define a stitch angle in this part of column.
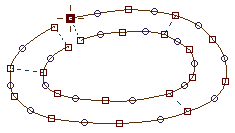
Digitizing of Applique object is identical to that of column object, with only exception that Applique must form a closed figure. Image at the left side depicts Applique before closing edges. There is a gap between start and end base.
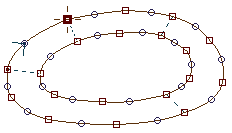
Applique object with closed edges. To ensure precise alignment of start and end base, use pop-up menu from the step 10. and select Close Edges command.
Adding New Nodes
Pop-up menu mentioned in above examples can be used to insert (or delete) new nodes on the vector edge.
If you need to add multiple nodes quickly, please use Fast Node Insertion Mode.