Embird Embroidery Software
Main Menu
Main Menu
Follow Embird on Facebook
Follow Embird on Twitter
Follow Embird on Instagram
Follow Embird on YouTube
Follow Embird on Pinterest

Main Window

Embird Studio - Main Window

Controls

  1. Hoop (Work Area). When starting a new design, the work area is blank. User can import image into background of work area. Default colors of work area and grid lines are specified and can be changed in Edit/Preferences.
  2. Rulers. Press left button on vertical or horizontal ruler and drag mouse to Work Area to create a Guide Line.
  3. Status Bar. The mouse cursor coordinates, zoom and tool hint or other information are displayed here. When an object is selected, the status bar displays its size and number of stitches. If editing/creating Fill object, the status bar displays angles of cover stitches and underlays.
  4. Transform, Edit, Zoom and Pan tools. Use Transform tool to move, rotate, or change parameters of an object. Use Edit tool to switch an existing object to edit mode.
  5. Creation tools. From top to bottom: Fill, Sfumato, Opening, Carving, Column, Column with Pattern, Outline, Manual Stitches, Connection, Applique, Applique Opening. Use these tools to create new objects. Read more about available objects here. Parameters of objects are described in a separate Parameters help file (Help/Parameters).
  6. Main menu. Read about main menu here.
  7. Palette of Colors. Click right mouse button on any color to adjust this color. To change color of an existing object, press left mouse button on color and drag and drop it on the object icon in Objects Inspector window (see 11 below). To set color that will be used for newly created objects click left mouse button on any color.
  8. Active Color. The Color that will be used for new objects is outlined in black and white.
  9. Button bar. The most used functions from main menu and pop-up menus are accessible through these buttons.
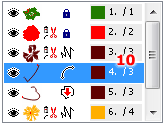
  10. Object Inspector window. All objects created on work area are displayed here in order of creation. It shows order of objects, their type, visibility and whether they are connected to previous object by jump or not.

    When composing complex design with many objects, it is sometimes difficult to isolate desired object in the work area. Use Object Inspector in this case. To change order of objects, select them with right mouse button, drag them to their new position, and release mouse button. To Hide/Show object click the eye icon to the left of each object.

    To access menu to duplicate, delete, or change parameters, click right mouse button on selected objects in Object Inspector window.

    A red scissors icon left to the object type icon indicates that there will be jump before this object, because it does not touch the previous object.

    To change color of object in Object Inspector, press left mouse button on any color in Palette (7) and drag it to this object. Then release the button. Another way is to double click the object icon to access the color dialog box, or use the Color command from the pop-up menu.

    Color can be dragged and dropped from object in the list onto the palette.

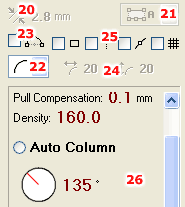
    To select non-contiguous subset of objects, depress the Ctrl key and left click on each object. In the editing mode the Object Inspector and Part Inspector windows (11) are replaced with basic parameters of the object.
    Embird Studio - Main Window Embird Studio - Main Window

  11. Part Inspector window. Openings (holes) of fill objects are displayed here as well as parts of joined and grouped objects. This window serves to select holes and parts for further manipulation, because they cannot be selected in work area and in Objects Inspector.
  12. Magnifying window. This window displays enlarged area around mouse cursor. It aids precise placement of nodes, allowing user to maintain view of design in the Work Area. To hide this window, use View/Zoom Window; this will enlarge the Parts Inspector window. When cursor moves over Object Inspector, this window displays enlarged object icon.
  13. Work area scroll bar.
  14. Display mode tabs. Click here to read mode about the display modes. Please note the Sim tab. Clicking on this tab starts the sew simulator.
  15. Button for sending the finished design to Embird Editor.
  16. Splitter for adjustment of Object Inspector / Parts Inspector size.
  17. Splitter for adjustment of size of the right panel.
  18. Buttons for browsing in Object Inspector (10). Buttons with arrow icons serve to skip objects of the same color or connected by connection. They help to browse the objects list faster when you need to find and select next or previous group of objects.

    Check box at the left side allows to use 'refined search' for browsing, which means that selection moves not only to items containing a jump stitch or change in the object color, but also to items containing a change in the object type.

Options and Parameters

  1. Embird Studio - Main Window  Width of column object created with C column mode. When starting a new object with C method, this parameter is automatically set according to distance between first two point placed by user. User can adjust this parameter at any time.
  2. Embird Studio - Main Window Column Mode combo box - choose method of column type objects creation: A - each side separately, B - alternate sides, C- both sides at once (constant width).
  3. Embird Studio - Main Window Edge Mode combo box - choose line or curve edge as default when creating new objects.
  4. Embird Studio - Main Window Middle Point First check box - if checked, new curve element is created so that on first click, line is created. On a second click line turns to a curve using the previous point (end of line) as middle point of curve. If it is not checked, the curve is created on a first click, but the middle point must be dragged to proper position.
  5. Curvature of the rectangle with rounded corners.
  6. Check boxes for snapping of nodes options (snap to nodes, snap to Work Area edges, snap to guide lines). Same options can be accessed in editing/creation mode via main menu > Nodes.
  7. Basic parameters of the newly created object. More parameters can be accessed with use of Objects/Parameters menu after finishing the object.

Back to Embird Tutorial Contents