
Navigate
Products
Download
eShop
Upgrade
Overview
Training
Support

Navigate
Products
Download
eShop
Upgrade
About
Training
Support
These parameters apply only to Fill objects.
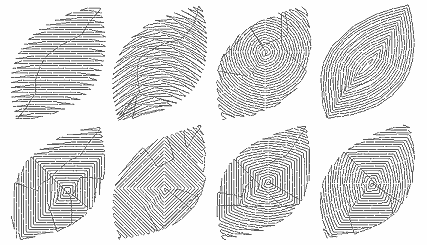
The Fill object can be filled with stitches in one of three ways:
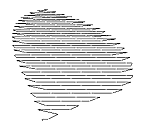
1. Plain Fill - parallel running stitches with Pattern.
2. Motifs
3. Auto Column - object is automatically filled with stitches in the same way as Column objects.
Plain Fill mode, Auto Column mode, Motif fills mode
Density is distance between rows of stitches or motifs. Density 4.0 indicates that this distance will be 0.2 mm. Default value of density is derived from the Default Thread Weight in Preferences.
![]() Pull
Compensation is extension of each stitch on edge of object in order to compensate for thread pull (on elastic
fabric) or sinkage (on fleece). The thread pull causes the ends of stitches are pulled inwards and object is smaller
(narrower) than intended.
Pull
Compensation is extension of each stitch on edge of object in order to compensate for thread pull (on elastic
fabric) or sinkage (on fleece). The thread pull causes the ends of stitches are pulled inwards and object is smaller
(narrower) than intended.
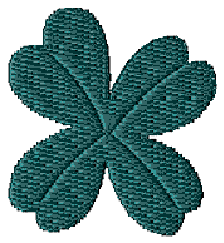
Pattern defines the texture of cover stitches of the fill. User can define up to five own patterns in main menu/Objects/User Editors/ User's Patterns Tab. Pattern effect is created with layout of needle points within rows of stitches. Therefore, length of stitches in fill is given by needle points distance in pattern. Additional lines and curves in patterned fill can be achieved with use of Carvings objects, which must follow immediately after Fill object and its openings.
Random Shift randomizes pattern to allow user to create fur-like effects, for example.
Scale parameter determines the size of the pattern and consequently the length of fill stitches.
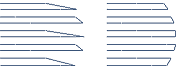
Complete row if density above defines the density under which the last point on each row of stitches is omitted (see the left picture). If the last point is not omitted, the result would be stitches that may be too small on the edge of fill. The pointed ends of rows are not visible on actual embroidery if default density is used. If distance between rows is higher than this threshold, last point on row is not omitted. This parameter is visible only if Show More Parameters box is checked.
![]() Max. Random Broadening defines maximum random prolongation of fill stitches to side. Random Broadening adds
'ragged edges' effect to objects.
Max. Random Broadening defines maximum random prolongation of fill stitches to side. Random Broadening adds
'ragged edges' effect to objects.
Use jumps (if loose density). If checked, connections between blocks of stitches are replaced with jumps (trims). Objects can be seldom sewn in a single draw. Therefore, object is usually divided into several blocks and they are connected either with connection stitches or jumps (mostly used on objects with gradient). This parameter is visible only if Show More Parameters box is checked.
Plain Fill Underlays. Edge and both Zig-Zag underlays can be usually turned on on all Plain Fill objects because Studio ignores these underlays on small objects. Turn them off if the fabric is firm and does not need the stabilization.
Edge and Zig-Zag underlay.
Red circle indicates the edge of object.
Edge Walk Underlay helps to make crisp edges of fill. Click here to find out more about Edge and Zig-Zag underlay offset.
Zig-Zag Underlays parameters define the angles and densities of these underlays. Zig-Zag underlays stabilize the fabric with a grid of loose stitches before sewing the higher density cover stitches. The angles of underlays can be set here as well as in the editing mode (press I or O key while moving the mouse in editing mode). To change the angle click on circular angle indicator or press mouse button on the angle value. Show More Parameters box must be checked to allow user to adjust angles and densities of zig-zag underlays.
If Show More Parameters box is not checked the angles of zig-zag underlay are adjusted automatically according to angle of cover stitches.
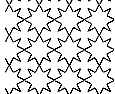
Motif is a simple stitch design that can be used to fill object instead of dense parallel stitches. User can define up to 5 own motifs in main menu/Objects/User Editors/ User's Samples Tab.
Shift defines movement of motifs in each row with respect to previous row.
Scale parameter determines the size of the motif and consequently the length of fill stitches.
Use jump stitches defines whether the jump (trim) or connection is inserted between distant rows of motifs or stitches. This parameter is visible only if Show More Parameters box is checked.
It is possible to use multiple motifs in a single object. Click hereto find out more.
Make Cover Stitches allows user to switch off cover stitches. Uncheck the box when one large underlay under the whole design is needed to provide stabilization. Edge, Zig-Zag 1 and Zig-Zag 2 allows user to switch off automatic underlays by checking the boxes. Click on the circular angle indicator at right side to set the cover stitches angle. When the Make Cover Stitches option is un-checked, a small green arrow icon appears next to the check box. This icon warns user that some settings (like density) are not applicable when there are no cover stitches.
Gradient affects the distance between rows of stitches or motifs within object. If density is 4.0 and gradient is 30.0, for example, the distance of rows will gradate from 0.2 mm to 15 mm according to set Gradient Type (Gradient Type combo box).
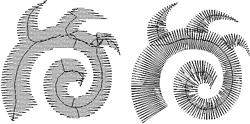
Effect. Plain Fill and Motifs Fill* may be combined with additional effects like Wave, Contour fill, Radial fill, Square fill and Rounded fill. Parameters of Wave can be adjusted by clicking on the wave control or by pressing mouse button on parameters values. Wave parameters define the curve of fill rows.Radial, Square and Rounded fill effects create stitches in a spiral starting from the 'Focus Point' of the object. User can adjust the Focus Point position in the Editing Mode.
* Motif Fill can be combined only with the Wave effect.
Use Pattern. If checked, the Auto Column uses pattern set in Plain Fill pattern combo box. Otherwise the column stitches are without pattern.
Following 5 Auto Column parameters are visible only if Show More Parameters box is checked:
Auto Select Column Underlay. If checked, the type of underlay for Auto Column objects is selected automatically.
Center. If Center is checked then columns will have underlay running along their center. Use this type of underlay for small or thin objects.
Edge underlay runs along edge of the object. It should be used for medium size and large objects.
Zig-Zag underlay should be used in combination with edge underlay for large or thick objects
![]() Density parameter indicates the density of the zig-zag underlay.
Density parameter indicates the density of the zig-zag underlay.
If more control is needed, convert the Fill object to Column object with more parameters available.
Direction of stitches in auto column fill can be controlled to some degree with direction lines. Click here to find out more.