

Navigate
Products
Download
eShop
Upgrade
Overview
Training
Support


Navigate
Products
Download
eShop
Upgrade
About
Training
Support


Typical usage of aligning stitches is for designs that are larger than the maximum hoop size supported by the embroidery machine, and therefore must be split into usable parts. Aligning stitches simplify the positioning of the various parts in the hoop when embroidering, allowing you to match up the split parts.
Note: In Embird, there are other ways of inserting aligning stitches. Read the Inserting Aligning Stitches and Inserting Aligning Stitches (Another Way) tutorials to find out more.
1 - Run Embird and click on the "Editor" menu.
2 - Open the file you want to edit. Select the "File > Open" menu to open a file.
3 - The size of the SUNFLOWER design in this example is 118.6 x 151.1 mm (Picture No. 1). It exceeds the maximum size of the hoop supported by the embroidery machine, which is 100 x 100 mm. Therefore, the design must be split and alignment stitches should be added to achieve precise alignment on the embroidery machine.
1. Open design
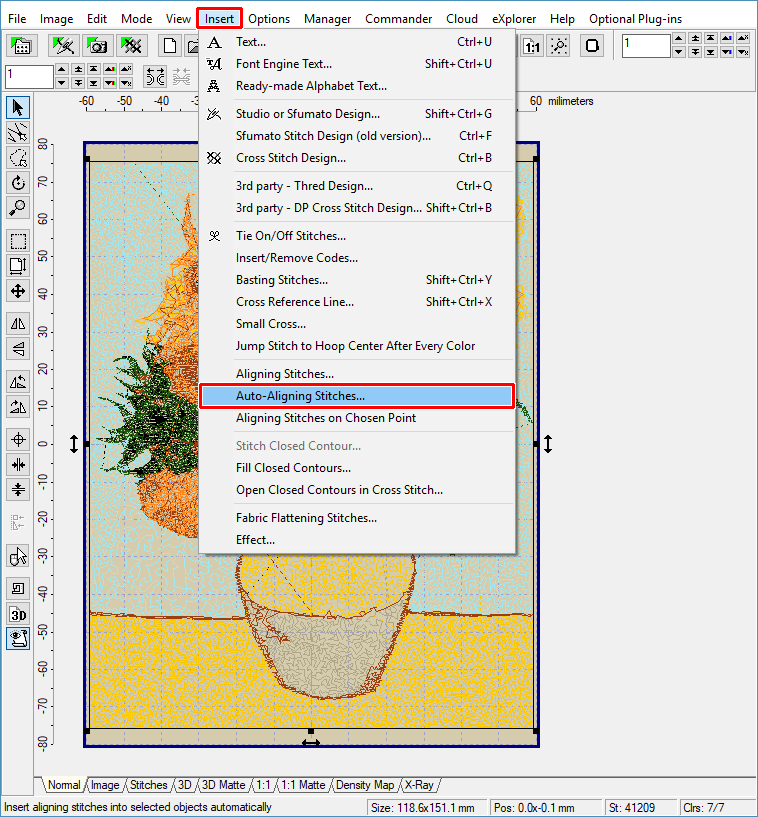
4 - Make sure that the design is selected - there is a black rectangle around it as shown in Picture No. 1. Select the menu "Insert > Auto-Aligning Stitches" (Picture No. 2).
2. Select menu Insert > Auto-Aligning Stitches
5 - Choose the hoop size supported by your embroidery machine (Picture No. 3). The design will be split into parts that fit the chosen hoop size. Click the OK button to confirm your selection.
3. Choose hoop size
6 - The design was split automatically into 4 parts. Alignment stitches were inserted automatically as well (Picture No. 4). Note the blue color stitches added after the last color, and the red color stitches inserted before the first color in (almost) every object. These stitches should match up when sewing on the embroidery machine (see also Picture No. 11 below).
4. Design was split and alignment stitches were added
7 - The alignment stitches might be saved to the design file on the hard disk as jump stitches or as running stitches, depending on the chosen option in the "Options > Long Running Stitches" menu (Picture No. 5).
5. Long running stitches
8 - Select the "File > Save Separated As" menu to save each design part to its own file on the hard disk (Picture No. 6).
6. Save each part to its own file
9 - Select the hoop size for saving design parts to the hard disk (Picture No. 7). It should be the same hoop size as was chosen in step 5 above (or a larger hoop size supported by your embroidery machine).
7. Choose hoop size, same as was used for splitting or larger
10 - Choose the file format (arrow 1 in Picture No. 8) and make sure that the option "Center in hoop" is switched ON (arrow 2). Confirm your selection by clicking the OK button.
8. Specify file format depending on embroidery machine type
11 - Enter the file name for saving part no. 1 (Picture No. 9).
9. Enter file name for part no. 1
12 - Embird will save each design part, always asking for its file name. To speed up this process, it is possible to use the same file name for every design part; only the number at the end of the file name will be different (Picture No. 10).
10. Use the same file name for every part
13 - Switch to the Manager window by selecting the "Manager" menu and view the design parts - each one fits the chosen hoop size 100 x 100 mm (Picture No. 11). The big red cross at the beginning of part 2 should be aligned with the big blue cross at the end of part 1, etc.
14 - Follow the steps shown in the tutorial Print Template to create a template of every design part. Use these templates for marking needle starting points on the fabric.
11. Check the design parts in Manager
Back to Embird Tutorial Contents
Developed by BALARAD, s.r.o. company since 1997