
Navigate
Products
Download
eShop
Upgrade
Overview
Training
Support

Navigate
Products
Download
eShop
Upgrade
About
Training
Support
In the current version of Studio, the mask effect can be achieved by using the 'Shaping' operations Intersection and Difference. We plan to add lasso splitting tool in the future.
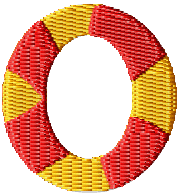
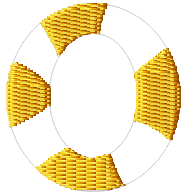
Imagine that we want to create circle with multi-color segments as illustrated on the left side picture. Instead of digitizing each segment manually, we will create the whole circle first and then we will split it with use of another object.
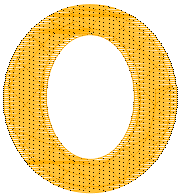
The first step is to create the large circle. We will use fill object with opening (hole) in this example. Please note: shaping commands do not work with linear objects like outline, connection or manual stitches.
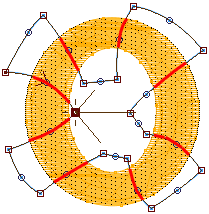
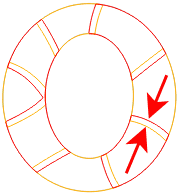
The next step is to draw object that will serve as a mask for splitting. The yellow circle will be sliced on places where mask run on top of the yellow circle (highlighted with red lines). Therefore, the mask edges must be drawn carefully on the intersection with yellow circle. On other places, you can draw it with lower accuracy.
In this example we use fill object as a mask. Mask can be any object (sfumato, column) except lines (outline, connection, manual stitches). The mask will have no stitches, it is only temporary object. Therefore, it does not matter where is its start and end point or how its parameters are set. Mask can even have one or several openings (holes).
3.
Select both objects (yellow circle and the blue mask object). Use the main menu > Transform > Shaping > Difference command to create new objects that are yellow circle minus blue area.
4.
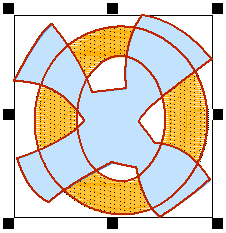
Resulting yellow objects are shown on the left-side picture. Now we are going to create complementary objects to fill the empty areas. We will use another shaping command to produce these objects.

5.
Before doing so, we need to enlarge mask to make new objects larger and overlapping the previously created yellow objects. This step is very important because if there is no overlay between objects, the pull effect of thread will cause gaps in the actual sew out.
Select the mask object and use the main menu > Transform > Expand Objects command.
Now select the original circle and new, larger mask. Use the main menu > Transform > Shaping > Intersection command to create areas common to both yellow circle and the mask.
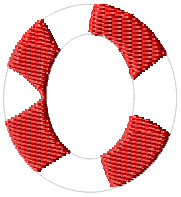
You should achieve objects that are complementary to above yellow objects. Change their color to red by dragging the red color from palette to selected objects. Now you should erase the original circle and mask objects, because they are still in the background. They were only temporary objects and we do not need them anymore.
Complete result looks like shown on the left-side picture. Respective segments are separate objects and it is useful to connect some objects (not shown in this example) with connection tool to reduce thread trimming. As the yellow color is sewn first in this case, connections between yellow objects can be hidden beneath red objects.
Wire-frame view mode reveals the overlays between the yellow and read areas.
Please note: objects in Studio can be sliced also with guide lines. However, this approach produces only straight-line cut.