
Navigate
Products
Download
eShop
Upgrade
Overview
Training
Support

Navigate
Products
Download
eShop
Upgrade
About
Training
Support
Embroidery design should contain as little thread trims as possible. Trims are time consuming and decrease the quality of embroidery because of potential thread loosening. Therefore, use connections between objects whenever possible to reduce the trims number. Connection is series of running stitches whose only purpose is to draw thread from one spot to another. Otherwise, there would be a trim. Studio has special tool (button on the left-side picture) for creation of connections. This tool is located in the tool bar at the left side of the Studio window.
![]()
Connections should be used between objects of the same color on places where they are not visible or where they do not affect too much the overall looking of design. They are often placed beneath other objects or along the outlines. In case of small lettering (or other small objects laying one near another) the connections are visible (because there are no objects to hide them), but they are made as short as possible. This type of connecting objects is called a 'nearest point' connection.
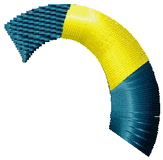
You should always select such sewing order of objects in design that there is a minimum number of trims required. In this case, we can sew both objects of the blue color first and then the yellow object on top of them. To avoid trimming between the blue objects, we will connect them with stitches. Connection can be hidden beneath the yellow object.
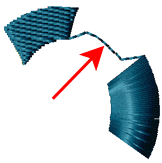
Define start and end point of each blue object so that inserted connection does not interrupt continuity of sewing. The first blue object (the left one) should end on a spot where connection begins. The second blue object should begin on a spot where connection ends.
There are two ways of how to create connection: 1. use connection tool to digitize connection node-by node. 2. select second blue object and use right mouse button click to invoke a pop-up menu. Then select 'Create Connection' from this pop-up menu. This will create a straight-line connection which can be edited node-by-node. The same command is available from the main menu > Transform.
Please note: to adjust straight-line connection by adding multiple nodes quickly, please use Fast Node Insertion Mode.
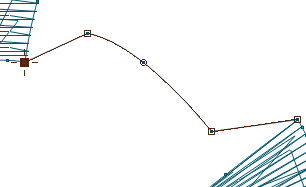
In our example connection has 3 elements - straight line, curve and one more straight line. The curve element has little circular node in the middle. The start point of connection is marked by cross.
Shape of connection was chosen so that connection runs mostly deep inside of the yellow object which will be sewn on the top. This helps to prevent showing of connection on the sew-out in case of little displacement of yellow stitches, which often happens as result of loose hooping of fabric or pull effect of the thread. If upper object is large enough, place connection at least 2~3 mm inside of the upper object. If it is small, place connection into the middle.
Connection ensures that the thread path is continuous from beginning of the first object (1) to end of the second object (4).
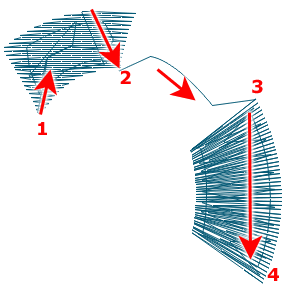
Please note that the first object is sewn from bottom up to point (2) and then from top down to point (2). This type of stitching is caused by location of the start point (1) and the end point (2). It is not possible to fill object with a single draw while preserving the start and end point and the fill type. However, program automatically inserts connection stitches inside of this object. User has to create connections only between separate objects, not within objects themselves where program makes all stitching automatically. This approach allows user to define overall stitch order without having to care about each individual stitch.
Connections have adjustable Minimum and Maximum Stitch length. Maximum-length stitches are used on straight-line connection segments. Curved segments are stitched with shorter stitches to form smooth curves. Minimum Stitch defines the shortest allowed connection stitch.
On places where running stitches between objects are not desired, connection object allows to create 'controlled jump stitch' for easier trimming.