
Navigate
Products
Download
eShop
Upgrade
Overview
Training
Support

Navigate
Products
Download
eShop
Upgrade
About
Training
Support
Plain fill is typically used for larger objects, which means long rows inside the fill. If each row would contain just 1 stitch (which is the case of column object), the stitches would be very long, loose and they would not create a compact fill. Therefore, the rows are split into number of shorter stitches. Optimum length of the stitches is approximatelly 4 millimeters. The split points are visible on the actual embroidery as a texture. It is possible to define a template for the split points and this template is called fill pattern in the Studio. Besides many pre-defined patterns, Studio provides also an editor tool to create your own, custom patterns.
The easiest way of how to learn making of your own patterns is to examine pre-defined Studio patterns. Use main menu > Objects > User Editors to open Editor tool, select Patterns tab and open any pattern from PATTERNS folder.
Patterns are pictures that define splitting of fill stitches. The colored dots or lines define place, where the fill stitch will be split. Use left mouse button to draw the dots and lines (with Shift key depressed) and right mouse button to erase them. Position of cursor in the drawing area is indicated by small cross in the preview at the right side of the window. This indicator helps to draw contiguous patterns.
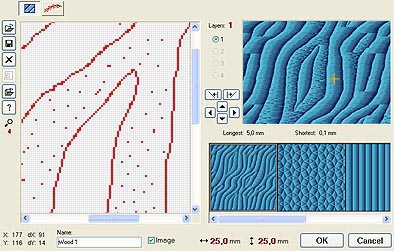
The meaning of controls in this window is following:
Layers are used to create interleaved pattern. If there are 4 layers in the pattern, for example, each layer applies only to the each 4th line of stitches. Consequently, final pattern looks like if there are all 4 layers interleaved.
![]()
Pattern with 4 layers. Each column of pixels belongs to
different layer.
The layer that is currently edited is highlighted.
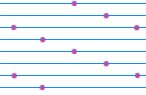
Pattern with 4 layers applied to rows of stitches.
Needle points appear on places where
stitches cross the pattern pixels.
Each layer (column in this case) applies
only to the each 4th line of stitches.

3D preview of stitches with pattern.
The fill with interleaved pattern is flat.
Interleaved pattern produces flat fill. For patterns with more puffy texture use single layer of pixels (no interleaving).
Save. Click this button to save pattern to disc. Patterns are automatically stored with design with which they were created, so you need to save pattern only if you want to use it in other design.
Open. Click this button to load some previously stored pattern into your design.
Clear. Click this button to reset selected pattern.
Import image into background. Click this button to open an image and use it as the template when drawing the pattern.
Skew left and Skew right. Click any of these buttons to modify the pattern. Sometimes a nice new pattern can be created from existing one by just clicking any of these buttons.
Move. Click any of these buttons to scroll pattern in the working area.