
Navigate
Products
Download
eShop
Upgrade
About
Training
Support

Navigate
Products
Download
eShop
Upgrade
About
Training
Support
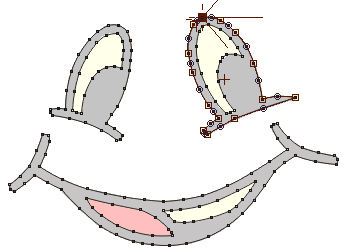
Designs (patterns) are digitized in Studio as outline (vector) objects with stitches layout based on the object type and parameters. The finished design is compiled and put into Embird Editor for final adjustment and save in appropriate machine embroidery format. Compilation involves generation of stitches for all vector objects, including those that were not filled with stitches by user.
To get started, please read the tutorials included in this help file. They are accessible from the left panel of this window. Tutorials are sorted in a recommended order of reading. Also, this help file contains other chapters like description of a main menu items and object parameters. Please refer to the index at the left side of this window for a specific topic.
Embird works with embroidery designs stored in two types of files: 1. stitch files, which can be loaded to embroidery machine but they are hard to edit and scale, 2. outline files, which are easy to edit and scale but they cannot be loaded directly into embroidery machine.
Difference between stitch and outline files can be compared to difference between raster (pixel) pictures, which cannot be enlarged very much because of decreasing quality, and vector graphic, which can be easily resized and edited.
Outline files are used to create and edit design. Then these outline files are converted (compiled) into stitch files for use with embroidery machine. There are many stitch file formats (with various file extensions) supported by Embird, because many embroidery machines use their own, native stitch file format. Basic Embird works mostly with the stitch files. Outline files are created and edited mostly in Embird Studio. These files have *.eof extension.
1. Stitch files contain list of individual stitches and optional commands like trims and color changes. These files are actual input data for all embroidery machines. However, designs in such format are hard to edit and resize, because only individual stitches are available and there is no information about what objects they form. If such design is displayed on a screen, the human brain easily identifies the parts of design like outlines, fills, etc. However, it is not so easy to identify these objects automatically with use of software program. Therefore, many editing functions and resizing may not work with 100% reliability on stitch files. Although the stitch file is the end product of embroidery software, designs are not created directly in this format.
2. Outline files are easy to edit and resize, because design in this format contains outlines of all objects with information for the software program how to generate stitches for each object. Design in this format does not necessarily contain stitches. The most important part are the outlines and parameters for filling the objects with stitches.
Embroidery designs should be created so that number of thread trims is minimal. To achieve this when working with vector objects, user must keep 3 basic rules on her/his mind:
1. Create objects in proper order (to allow their connection).
2. Add connections between objects whenever possible (where they are hidden under other objects or where they do not spoil the look of design).
3. Define start and end points of objects properly (to allow continuous flow of the thread).
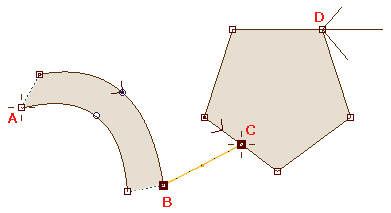
There are 2 objects in above example. The first one (left) is column. The second one (right) is plain fill object. They are connected by connection, which is in fact an object too, and must be inserted between the column and the fill (see below list of objects from the object inspector window).
Column has start point A. Each column ends on the opposite side, which is point B, in this case. To avoid thread trim, connection was added from point B to C - the start point of the fill. End point of the plain fill can be defined anywhere on the fill boundary, even in hole (if the fill has any). It is point D, in this case.
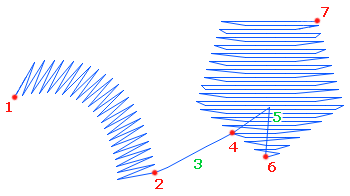
When stitches are generated for above objects, thread fills continuously all objects. It starts in point 1. Then it fills whole column with zig-zags and ends in point 2. Then it fills connection with series of running stitches (3) until it reaches point 4, which is start point of the plain fill objects. To cover complete area of the object, the thread must start filling in point 6, in this case. Therefore, connection (5) is automatically generated from point 4 to 6. After filling the whole object, thread stops in the end point 7.
Running stitches are 'normal' stitches embroidered by machine. They form continuous series of stitches, usually 0.5 mm ~ 5 mm long. Some objects in design are separate and machine must move needle to a new position. To define such move (without stitching), the jump 'stitch' is used.
The jump can be regarded as a very long and loose stitch. Although it is just move of the needle, we call it 'stitch', because needle penetrates the fabric at the end of previous running stitch, i.e. at beginning of the jump, and at beginning of the next running stitch, i.e. at the end of the jump. From this point of view, the jump is the same stitch like the 'normal' stitches, but usually much longer. This fact is used for embroidering very broad satin stitches (see below).
Most embroidery machines have 12.7 mm limit for longest possible running stitch. Some machines have even shorter limit ~ 12.1 mm. It is possible to use satin stitches longer than this limit. Such stitches Embird codes as series of short starting running stitch and single or multiple jump stitches. Please note that such stitches look queer on the screen, because of the jump stitches in the middle (displayed with dashed line). However, stitches on the actual sew-out are all right.
Embroidered design with long satin stitches (longer than 8~10 mm) may be easily damaged by washing because of the loose stitches. We recommend to use pattern (texture), which splits long stitches into shorter ones.
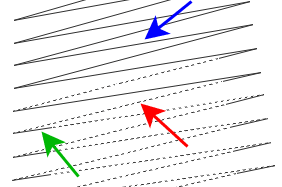
Blue arrow marks the normal running stitch, i.e. running stitch shorter than limit.
Longer stitches are automatically divided into short running stitch (green arrow) and series of jump stitches (red arrow). When embroidered on a fabric, all stitches look the same. There are no needle points in the series of jump stitches.
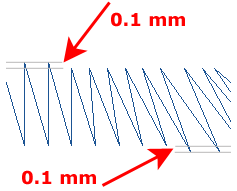
The shortest possible move of needle on most embroidery machines is 0.1 mm in both axes. Stitches in stitch files are coded with use of 0.1 mm grid. Therefore, if you open stitch file in Embird Editor and zoom-in the stitches sufficiently, you will discover very small steps on edges which seemed to be smooth at a small zoom. These little steps are caused by 0.1 mm grid.
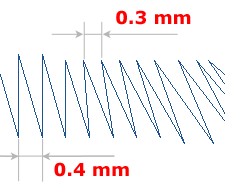
The stitch density in Embird is defined as distance between needle points in above mentioned 0.1 mm grid. Density 4.0 means four steps of 0.1 mm, i.e. 0.4 mm. The commonly used density of satin and fill stitches is approximately 3.0 - 4.0, according to weight of thread used for actual embroidering. 0.1 mm step cannot be further divided into smaller steps. Therefore, density 3.5 does not mean that distance of all needle point pairs is 0.35 mm. It means that some pairs have 0.3 mm distance and some pairs have 0.4 mm distance. The average distance is 0.35 mm.
Studio uses the same density definition as basic Embird, but the 0.1 mm grid affects only exported stitch files. Outline file format allows to put stitches anywhere, not just to 0.1 mm grid. However, when you compile outline file into stitch file in Embird Editor, above mentioned effects appear. It is not an error. This is the way how it is supposed to work.