
Navigate
Products
Download
eShop
Upgrade
Overview
Training
Support

Navigate
Products
Download
eShop
Upgrade
About
Training
Support
Sfumato Stitch is additional plug-in for Embird. To use it, you must download and install it separately.
Detailed description of Sfumato Stitch controls and some Painter functions is given in this tutorial.
The main goal is to describe How and When should be used particular controls and functions .
Important Tips for
work with Sfumato Stitch and Painter:
|
 |
More Controls window Make Short Stitches Longer. If set on, Sfumato will prolong stitches shorter than 0.5mm. This may somewhat distort edges of objects like letters etc. Vertical Fills. By default, Sfumato fills darkest areas with horizontal fills. You may want to change direction of fills, especially on designs with majority of horizontally oriented dark objects like mouth, eyes, eyebrows. Better (but Longer) Calculation. If set on, Sfumato pays more attention to reduction of stitches crossing forbidden areas marked by Background colors (which are Lime and Fuchsia by default). Usually, you do not need to use this option on simple designs like portraits. Use it on more complex designs with lot of different forbidden (background) areas and designs with complex shapes (tiger head with protruding moustaches). Even if you do not use this option, Sfumato eliminates stitches going through background areas by snapping them to edges of design. However, this may cause that edges are stitched several times on some places. |
| Reduce Stitch Count. If set on, Sfumato
tries to reduce number of stitches of final design by rearranging short stitches. This may reduce about 10% of
stitches. However, very dark (almost black) areas may be little distorted.
Use Two Colors. If set on, design is created in two colors (or different shades) instead of just on color. Reverse Sewing Order of Colors. By default, Color no.1 (which is the darker color) sews as first. You may want to swap sewing order of Color 1 and 2. You may as well swap colors on finished design in Embird Editor. Outline in Color 2 instead of Color 1. By default, Sfumato creates dark outline in Color 1 around outlined Background areas. You may want the outline to be in Color 2, especially when creating design in bright colors to be sewn on dark fabric. Color 1 for Dark Tones. Color 2 for Light Tones. Sfumato approximates shades of photo by lines and curves created with thread. Darker tones of photo are approximated by thread of Color 1. Lighter tones are approximated by thread of Color 2. You may set the threshold of these two color with use of scrollbar. Threshold value may vary between numbers 0 and 255, where 0 represents black tone and 255 white tone. Setting threshold to 160 causes that tones darker than 160 or equal to 160 will be sewn in Color 1. Tones lighter than 160 will be sewn in Color 1. The threshold value is also indicated by horizontal blue line on Tone Curve Box in Sfumato Stitch Controls. Default Values. Use this button to set all controls to default values. |
Hoop. Combo box for selection of hoop type and size. Only those parts of design, which are inside of hoop will be covered with stitches after computation, although Preview window shows whole design. You can move the hoop in the Preview window if you move the mouse with right button pressed. Regarding hoop size: current version of Sfumato offers only three predefined sizes of hoops. However, you can always choose the maximum hoop, but make design (image) only as big as to fit into your machine's hoop. When Sfumato finishes the calculation, design appears in the Embird Editor window. Here, you can select the right hoop and finally save the design.You may ask why Sfumato offers 3 different hoops if it is always possible to use maximum hoop and then chose the right hoop later in Embird Editor. It is because when creating design for multiposition hoop (Viking Plus), Sfumato needs to know how and where it should split design. |
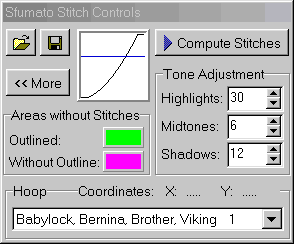
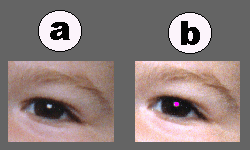
Sfumato Stitch Controls window More. Hit this button to access More Controls window. Tone Curve Box. On this area, tone curve of image and horizontal line representing value of threshold of thread Color 1 and 2 are displayed. Usually, design created directly from photo (if tone curve would be straight) looks much different than photo. By deformation of tone curve you may enhance the look of design. Deformation of curve (or tone adjustment) can be done with use of Highlights, Midtones and Shadows controls. The course of tone curve determinates how input tones from photo will be transformed to output tones of design. Input tones are represented by horizontal axis and output tones by vertical axis. Bottom left corner represents black and top right corner represents white. Highlights, Midtones, Shadows. Use these controls to enhance look of design in Preview window. Take a look at below picture of creating baby portrait to see how tone adjustment controls work. Fist picture (a) shows design created from photo with straight tone line. You can see that design is flat and without contrast. We can improve its look by decreasing the Midtones value (picture b), which means that dark tones and middle tones will by darker while leaving bright tones almost untouched. The design is still not very contrast. Therefore, we add more Highlights and Shadows (picture c). |
 | Colors of areas without stitches. All areas of image which are filled with these colors are forbidden for laying of stitches, which means that Sfumato will avoid to place stitches there. Thus, you can eliminate the background from the image. You may want to create thin running-stitch outline on edges of remaining design. Therefore, there are two types of background (forbidden areas) available: background with and without outline. Background with outline is by default of green color (Lime). Background without outline is by default of magenta color (Fuchsia). Sfumato can recognize background colors only if their R,G,B values in Controls window are exactly the same as on the image. Outlined background may be used around objects like head or figure. Background without outline should be used on areas like bright in eyes (pictures on the left) or on teeth where stitches are undesirable as well as outlines. |
| Compute Stitches. When
you finish all work on image, enhancement of design look and setting of controls (including selection and placement of
hoop), hit this button to start calculation of design. Do not forget to "Save Sfumato Stitch Project" to
preserve settings. Calculation of stitches may last several minutes (4 inches design on 400 MHz computer) or even hours
for very large designs (10 inches design on the same computer). When calculation is over, chose "Return to Embird
Editor" for further work with design. In demo version, Sfumato uses stitch count limit for all designs, which
means that designs may appear incomplete in Embird Editor. If you want to try complete Sfumato Stitch designs, please
use designs provided with Embird Plus. These designs are located in the same folder as Embird (usually EMBIRD32), in
the subfolder FILES.
Open Sfumato Stitch Project. Hit this button to open previously created project. Project contains values of all Sfumato Stitch controls and link to image. If image was deleted or moved in the meantime, you will have to import image from Painter menu. To preserve links between projects and images, it is highly recommended to save all images and projects into default subfolder PROJECTS. The reason why images are just linked not stored in the project files is that by leaving images in original .BMP or .JPG form Sfumato allows you to edit them also in other programs. Save Sfumato Stitch Project. Hit this button to save values of settings and link to image into so called "project" file (extension .ss1). To preserve links between projects and images, it is highly recommended to save all images and projects into default subfolder PROJECTS. |
2. Painter
| BMP or JPG picture loaded into Sfumato (Painter) should be not larger than about 3000 x 3000 pixels. In fact, 1500 x 1500 pixels picture has enough detail for maximum design that Sfumato can create. When scanning the photo in scanning programs, you can adjust size of scanned picture by selecting the lower resolution of scanning. |
|
Adjust Image Characteristics functions from Painter/Adjust menu
|
Left Picture. This picture shows image or selected part of image on which adjustments will be applied.
Right Picture. This picture shows another selection made from left picture based on Selected Color and similar colors. Range of similarity is given by Fuzziness value. The larger is the Fuzziness, the wider is the range of selected colors. The "strength" of color selection is greater for more similar colors than for less similar colors. The "strength" of color selection is represented by brightness of gray areas on the right picture. To select new color, move cursor over the left image and pick desired color. |
| You may decide to make
adjustments on image areas shown on left picture or just on the selected color and similar colors. In the second case,
set "Affect Only Selected Color and Similar Colors" to on.
Usually, you do not want to affect Background Colors on the image, because Sfumato Stitch would not recognize them if they change. Therefore, "Do Not Affect Background Colors" check box is checked by default. Gamma Correction. If Gamma Correction is set to greater than zero, dark areas of image will become brighter (if Gamma Correction is set to lower than zero, dark areas of image will become even darker). This function is important for scanned images, because they are often too dark. This function does not affect highlights very much. Therefore, use it when you are satisfied with highlights and you only want to brighten dark areas of selection. If the whole selection is too dark and you want to distribute shades equally from black to white, use Equalize function from Painter/Adjust menu. Brightness, Contrast. Use these functions to improve look of whole image, its parts or selected colors. You may combine selection of area and colors by selecting the area of image first (in the Painter), then entering this Adjust Image Characteristics window and making further selection of colors. Thus, you can make eyebrows, mouth, nose or other parts of image more distinctive. |
|
Histogram graphs the number of pixels at each brightness level in an image. It gives a quick picture of the tonal range of the image. The tonal range of image after equalization (New Histogram) is same or wider than before equalization (Old Histogram). |
Equalize function from Painter/Adjust menu You may want to emphasize some areas of image to achieve better looking design. Equalize function redistributes the brightness values of the pixels in an image so that they more evenly represent the entire range of brightness levels. Typically, this function is used separately for hair, face, shirt and other parts. The below picture shows equalization effect on the hair. Equalize Selection Based on Entire Image setting means that brightness values of whole image are redistributed, but only selected pixels are really changed. Thus, selected area is equalized in appropriate brightness range and not whole black-to-white range. Equalize Selection Based on Selection setting means that brightness values of selected pixels are redistributed in whole black-to-white range. Usually, it is desirable to not affect background colors by equalization, because Sfumato Stitch would not recognize them if they change. Therefore, "Do Not Affect Background Colors" check box is checked by default |
Back to Embird Tutorial Contents
Developed by BALARAD, s.r.o. company since 1997