
Navigate
Products
Download
eShop
Upgrade
Overview
Training
Support

Navigate
Products
Download
eShop
Upgrade
About
Training
Support
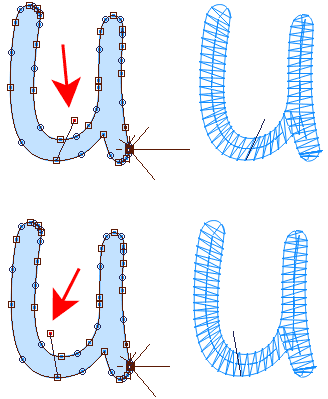
Auto Column uses advanced algorithms to fill object with satin stitches in a way as close to work of human digitizer as possible. However, user may still want to change direction of stitches on some places. This can be achieved by direction lines (marked by red arrow), which are lines drawn from any edge node across the filled area. If direction line does not cross the filled area, it has no effect on the stitches direction. Below example illustrates influence of direction line on the auto column stitches.
While in creation/editing mode, select node from which you want to draw direction line. This node will be the start point of the line. Then click right mouse button on a place where the end of the line should be. Right button click marks this spot and invokes the pop-up menu at the same time. Select "Place Direction Node Here" command to finish the direction line.
To delete direction line, simply delete the node at the end of this line.