
Navigate
Products
Download
eShop
Upgrade
Overview
Training
Support

Navigate
Products
Download
eShop
Upgrade
About
Training
Support
In Embird, it is possible to create lettering using Ready-made (3rd party) Alphabets - it is possible to load whole alphabet and write words easily while using all other features of alphabet interface - moving along chosen baseline, gap adjustment, individual character moving/rotating/enlarging/skewing/mirroring, envelope, etc. (See also tutorials Lettering 1 (General), Lettering 2 (Individual Settings), Lettering 3 (Envelope) and Lettering 4 (Custom Baselines)). This new feature is enabled for all users who have registration of Font Engine Plug-in. For others it works in demo mode, allowing to enter only 3 characters.
1 - Run Embird and click "Editor" menu to switch to Editor window.
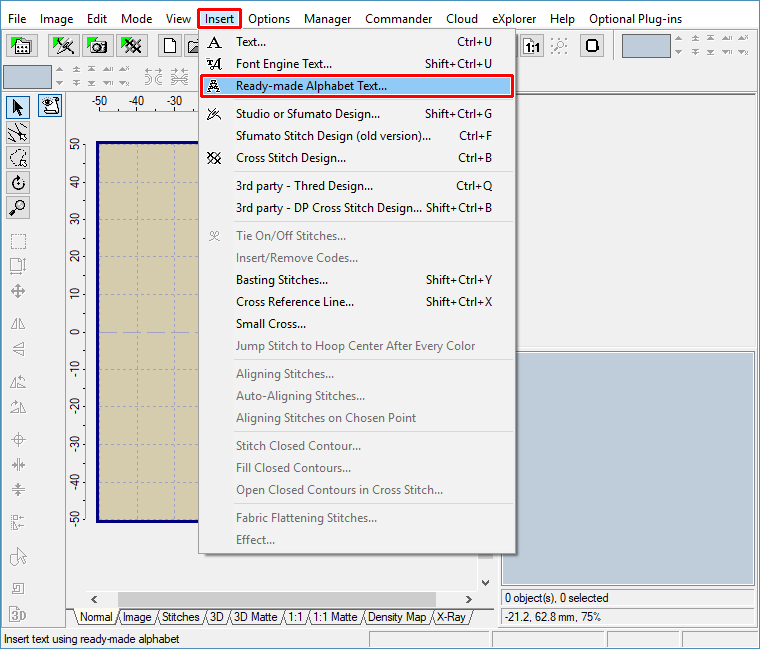
2 - Select "Insert > Ready-made Alphabet Text" menu (Picture No. 1).
1. Select "Insert > Ready-made Alphabet Text" menu
3 - The "Insert Ready-made Alphabet Text" dialog box will appear on the screen (Picture No. 2). It is supposed that you have purchased some alphabets from 3rd party digitizers, and have them stored somewhere on hard disk, each character in its own file. Click "Add ready-made alphabet to list" button as shown in Picture No. 2.
2. Click "Add ready-made alphabet" button
4 - There exist two ways how to load ready-made alphabets into Embird (Picture No. 3). Either you have the .TXT file which contains information about pairing "character X is stored in file Y" (button 1, see also step 12 below) or you select the whole folder which should contain only designs of ready-made alphabet (button 2). Click "Add Folder" button.
3. Click "Add Folder" button
5 - Select the folder which contains designs of ready-made alphabet (Picture No. 4). It is supposed that each character is stored in separate file, and that there are only alphabet characters stored in chosen folder.
4. Select folder with characters of ready-made alphabet
6 - Selected folder was added to the list (Picture No. 5). The preview of two characters is shown at the right side of window. Click "OK" button.
5. List of ready-made alphabets with two characters preview
7 - Back in the "Insert Ready-made Alphabet Text" window you will see the icons of all available characters of chosen ready-made alphabet (Picture No. 6). It is possible to create lettering right now - by double-clicking the icon of character in the grid. However, because Embird does not know which character is shown on chosen icon, it will show different characters in "Text" box. Nevertheless, if you click "OK" button, it will compile the right text (lettering BIG in this example).
6. Double-click the icon in the grid to write the text
8 - If you plan to use this alphabet massively, it is recommended to map its characters. Embird will learn this way which icon is associated with which character, and so the pressing of "A" key on keyboard will write "A" character into the "Text" box, etc. To map the characters, just write down into the "Text" box the sequence of characters as you see them in the grid. If you write all characters shown in the grid, the "Map characters" button becomes enabled. Click this button (2 in Picture No. 7).
7. Mapping characters of ready-made alphabet
9 - Now you can create lettering by writing down the words into the "Text" box (Picture No. 8).
8. Type in the text, the characters are correctly mapped into ready-made alphabet
10 - Click "Properties" tab and "Layout tab" to change various settings of lettering (Picture No. 9).
Note:
There are several points shown on the layout area, allowing you the following:
A. Use red points to move the character along the baseline.
Depress CTRL key to move only selected character; otherwise, all characters placed after selected character will move.
B. Use green points to rotate the character.
Depress CTRL key to change the angle by 15 degrees.
Depress ALT key to set the angle to 0 degrees.
C. Use teal points to resize the character, either horizontally or vertically.
Depress CTRL key to change the size in larger steps.
Depress ALT key to maintain the aspect ratio of width and height.
D. Use purple points to skew or mirror the character, either horizontally or vertically.
Depress CTRL key to skew in larger steps.
Depress ALT key to mirror the selected letter.
Depress SHIFT key while moving the point to apply the operation to all characters.
Please note that undo/redo/reset operations are available for changes in Layout; use the buttons located below layout area.
9. Change the various settings of lettering
11 - Click "OK" button to compile the lettering and place it into work area of Editor (Picture No. 10).
10. Compiled lettering in work area of Editor
12 - The click on "Map Characters" button (Picture No. 7) creates .TXT file in which each line contains information "character X is stored in file Y" (Picture No. 11). If you are a digitizer who creates new alphabets and you plan to sell them, you should include also this .TXT file into your package.
11. The structure of text file with character map
Tip 1: You can prescribe also additional space which will be left before placing the character and after placing the character. For example, if you want to leave 3 mm before placing "I" character, and 4 mm after placing "I" character, please modify the line with "I" character this way: I="filename.ext",30,40. You can prescribe also negative numbers if you want to decrease the gap. The distance is specified in tenths of millimeter. Also, it is possible to prescribe the third parameter, which allows to make vertical shift of character. For example I="filename.ext",0,0,50 for moving the "I" character 5 mm up.
Tip 2: It is possible to change these settings also in Embird by right-click on character in the grid in Picture No. 6. A popup menu will appear, allowing you to modify mapping, spacing and vertical shift of right-clicked character (Picture No. 12).
12. Change character properties
13 - If there is .TXT file with information "character X is stored in file Y" available, please select it by pressing "Add Text File" button in Step 4 above instead of "Add Folder" button (Picture No. 13). In such a case the alphabet is ready to use, because all its characters are already mapped - user does not have to make it himself/herself as shown in step 8 above.
13. Use "Add Text File" button instead of "Add Folder"
Back to Embird Tutorial Contents
Developed by BALARAD, s.r.o. company since 1997