Use commands in Tools menu to choose the editing tool.
Tools Menu Commands:
Marquee
Use Marquee tool to select a rectangular area of crosses. To select an area, click the left mouse button and drag the mouse until the flashing outline surrounds the area you want. Release the mouse button. Depress Shift and Alt keys simultaneously if you want to select only crosses and no back stitch lines. Clicking either mouse button outside the outline turns the area selection off. When you select an area, you can use Edit menu commands to cut, copy, paste, mirror, rotate, duplicate and delete the selected crosses. You can also hold the mouse button down to move the area.
Lasso
Use Lasso tool to select a free-form area of crosses. To select an area, click the left mouse button and drag the mouse to create a line around the area. When the line is a complete circle, release the mouse button. Depress Shift and Alt keys simultaneously if you want to select only crosses and no back stitch lines. Clicking either mouse button outside the outline turns the area selection off. When you select an area, you can use Edit menu commands to cut, copy, paste, mirror, rotate, duplicate and delete the selected crosses. You can also hold the mouse button down to move the area.
Magic Wand for Contiguous Area
Use Magic Wand for Contiguous Area tool to select contiguous area of the same color.
Click on the color you want to select. The threshold
control allows you to specify the tolerance setting. Depress Shift key to add chosen area to current selection. Depress Alt key to remove chosen area from current selection. Depress Shift and Alt keys simultaneously if you want to select only crosses and no back stitch lines. Clicking either mouse button outside the outline turns the area selection off. When you select an area, you can use Edit menu commands to cut, copy, paste, mirror, rotate, duplicate and delete the selected crosses.
You can also hold the mouse button down to move the area.
Magic Wand for Non-contig. Area
Use Magic Wand for Non-contiguous Area tool to select the non-contiguous area of the same color. Otherwise this tool works the same way as Magic Wand for Contiguous Area.
Zoom
Use Zoom tool to increase and decrease the zoom factor. Use left clicks to zoom in and right clicks to zoom out.
Eye-Dropper
Use Eye-Dropper tool to select the color under the cursor as either cross color 1 or cross color 2. Use left clicks to select the cross color 1 and right clicks to select the cross color 2.
Eraser
Use Eraser tool to clear the crosses under the cursor. Before you start erasing,
you might want to choose the width of eraser tool, and the cross type (see below). Use left mouse button to clear the chosen cross type, use right mouse button to clear the complete cross.
Smooth
Use Smooth tool to smooth the edges under the cursor by adding 3/4 stitch. Click left mouse button and drag the cursor across work area. Release the mouse button when you finish smoothing. Before you start smoothing,
you might want to choose the width of smooth tool and cross layers (see below).
Clear Isolated Points
Use Clear Isolated Points tool to remove the isolated points under the cursor. Click left mouse button and drag the cursor across work area. Release the mouse button when you finish clearing. Before you start clearing,
you might want to choose the width of this tool (see below).
Pencil
Use Pencil tool to paint free-form lines and shapes using the current pen style. To sketch with the Pencil tool, click a mouse button and drag the pencil across work area. Release the mouse button when you finish sketching. Before you use this tool,
you might want to choose the width of pen, the cross type
and cross layers (see below).
Use left mouse button to paint with cross color 1 and right mouse button to paint with cross color 2. Depress the Alt key while painting to clear the crosses under the cursor.
Brush
Use Brush tool to paint free-form patterns using the current brush pattern and shape. To paint, click a mouse button and drag the brush across work area. Release the mouse button when you finish painting. Before you use this tool,
you might want to choose the brush type, the cross type
and cross layers (see below). Use left mouse button to paint with cross color 1 and right mouse button to paint with cross color 2. Depress the Alt key while painting to clear the crosses under the cursor.
Air-Brush
Use Air-Brush tool to paint free-form patterns similar to a real airbrush on work area.. To use the airbrush, you can either click a mouse button once and drag the airbrush, or you can click it repeatedly, as if you were repeatedly pressing the nozzle of a spray can. If you drag it slowly, it paints a thick pattern. If you drag it quickly, it paints a scattered, thinner pattern. Before you use this tool, you might want to choose
the brush type, the cross type
and cross layers (see below). Use left mouse button to paint with cross color 1 and right mouse button to paint with cross color 2. Depress the Alt key while painting to clear the crosses under the cursor.
Text
Use Text tool to add text to work area. Click where you want the text to begin. A flashing cursor appears, and you can begin typing text. Before you use this tool, you might want to specify how and where you want the text displayed, the cross type
and cross layers (see below). Choose font and
text alignment in Text menu.
Line
Use Line tool to paint straight lines. Press the mouse button and drag the Line tool across work area. Release the mouse button when you've finished drawing the line. If you want the lines you paint to be limited to 45-degree increments, hold down Shift as you draw the line. With Shift down, you can paint only a horizontal or vertical line or a line on a 45-degree angle. Before you use this tool,
you might want to choose the width of pen, the cross type
and cross layers (see below). Use left mouse button to paint with cross color 1 and right mouse button to paint with cross color 2. Depress the Alt key while painting to clear the crosses under the cursor.
Simple Curve
Use Simple Curve tool to paint curves.
Click and drag to draw a line of the appropriate length. Click the line you just created and drag it to create the arc you want.
The point you select on the line determines the shape of the arc. To create a symmetrical arc, click the center of the line.
If you want the lines you paint to be limited to 45-degree increments, hold down Shift as you draw the line. With Shift down, you can paint only a horizontal or vertical line or a line on a 45-degree angle. Before you use this tool, you might want to choose
the width of pen, the cross type and
cross layers (see below). Use left mouse button to paint with cross color 1 and right mouse button to paint with cross color 2. Depress the Alt key while painting to clear the crosses under the cursor.
Rectangle
Use Rectangle tool to paint an empty rectangular frame in work area. This tool paints a line around the rectangle using the current line width. To paint a rectangle, place the cursor where you want the corner of the frame to start. Then click a mouse button and drag the tool until the frame outline surrounds the area you want. Release the mouse button. With Shift down, you can paint a square. Before you use this tool,
you might want to choose the width of pen, the cross type
and cross layers (see below). Use left mouse button to paint with cross color 1 and right mouse button to paint with cross color 2. Depress the Alt key while painting to clear the crosses under the cursor.
Round Rectangle
Use Round Rectangle tool to paint an empty frame shaped like a rounded rectangle in work area. This tool paints a line around the rounded rectangle using the current line width. To paint a rounded rectangle, place the cursor where you want the corner of the frame to start. Then click a mouse button and drag the tool until the frame outline surrounds the area you want. Release the mouse button. With Shift down, you can paint a square. Before you use this tool,
you might want to choose the width of pen, the cross type
and cross layers (see below). Use left mouse button to paint with cross color 1 and right mouse button to paint with cross color 2. Depress the Alt key while painting to clear the crosses under the cursor.
Ellipse
Use Ellipse tool to paint an ellipse-shaped empty frame in work area. This tool paints a line around the ellipse using the current line width. To paint an ellipse, place the cursor where you want the corner of the frame to start. Then click a mouse button and drag the tool until the frame outline surrounds the area you want. Release the mouse button. With Shift down, you can paint a circle. Before you use this tool,
you might want to choose the width of pen, the cross type
and cross layers (see below). Use left mouse button to paint with cross color 1 and right mouse button to paint with cross color 2. Depress the Alt key while painting to clear the crosses under the cursor.
Regular Polygon
Use Regular Polygon tool to paint a regular polygon-shaped empty frame in work area.
This tool paints a line around the regular polygon using the current line width. To paint a regular polygon,
place the cursor where you want the corner of the frame to start.
Then click a mouse button and drag the tool until the frame outline surrounds the area you want. Release the mouse button.
With Shift down, you can paint a symmetrical regular polygon. Before you use this tool,
you might want to choose the width of pen, the cross type
and cross layers (see below). Use left mouse button to paint with cross color 1 and right mouse button to paint with cross color 2. Depress the Alt key while painting to clear the crosses under the cursor.
Star
Use Star tool to paint a star-shaped empty frame in work area.
This tool paints a line around the star using the current line width. To paint a star, place the cursor where you want the corner of
the frame to start. Then click a mouse button and drag the tool until the frame outline surrounds the area you want.
Release the mouse button. With Shift down, you can paint a symmetrical star. Before you use this tool,
you might want to choose the width of pen, the cross type
and cross layers (see below). Use left mouse button to paint with cross color 1 and right mouse button to paint with cross color 2. Depress the Alt key while painting to clear the crosses under the cursor.
Filled Rectangle
Use Filled Rectangle tool to paint a rectangular filled-in frame in work area. This tool paints a line around the rectangle using the current line width. To paint a filled rectangle, place the cursor where you want the corner of the frame to start. Then click a mouse button and drag the tool until the frame outline surrounds the area you want. Release the mouse button. With Shift down, you can paint a square. Before you use this tool, you might want to choose the
width of pen, the cross type and cross layers (see below). Use left mouse button to paint with cross color 1 and right mouse button to paint with cross color 2. Depress the Alt key while painting to clear the crosses under the cursor.
Filled Round Rectangle
Use Filled Round Rectangle tool to paint a filled-in frame, in the shape of a rounded rectangle, in work area. This tool paints a line around the rounded rectangle using the current line width. To paint a rounded rectangle, place the cursor where you want the corner of the frame to start. Then click a mouse button and drag the tool until the frame outline surrounds the area you want. Release the mouse button. With Shift down, you can paint a square. Before you use this tool, you might want to choose the width of pen, the cross type and cross layers (see below). Use left mouse button to paint with cross color 1 and right mouse button to paint with cross color 2. Depress the Alt key while painting to clear the crosses under the cursor.
Filled Ellipse
Use Filled Ellipse tool to paint an ellipse-shaped filled-in frame in work area. This tool paints a line around the ellipse using the current line width. With Shift down, you can paint a circle. Before you use this tool, you might want to choose the width of pen, the cross type and cross layers (see below). Use left mouse button to paint with cross color 1 and right mouse button to paint with cross color 2. Depress the Alt key while painting to clear the crosses under the cursor.
Filled Regular Polygon
Use Filled Regular Polygon tool to paint filled regular polygon in work area. This tool paints a line around the polygon using the current line width. With Shift down, you can paint symmetrical polygon. Before you use this tool, you might want to choose the width of pen, the cross type and cross layers (see below). Use left mouse button to paint with cross color 1 and right mouse button to paint with cross color 2. Depress the Alt key while painting to clear the crosses under the cursor.
Filled Star
Use Filled Star tool to paint filled star in work area. This tool paints a line around the star using the current line width. With Shift down, you can paint symmetrical star. Before you use this tool, you might want to choose the width of pen, the cross type and cross layers (see below). Use left mouse button to paint with cross color 1 and right mouse button to paint with cross color 2. Depress the Alt key while painting to clear the crosses under the cursor.
Fill Contiguous Area
Use Fill Contiguous Area tool to fill contiguous area of your work area with the currently selected color. It fills in any area of work area that is a single color. If you use this tool on an area that's not entirely surrounded by other colors, the color leaks out into other parts of the work area that are the same color as the original area. Before you use this tool,
you might want to choose the cross type and cross layers (see below). Use left mouse button to fill with cross color 1, use right mouse button to fill with cross color 2.
Fill Non-contiguous Area
Use Fill Non-contiguous Area tool to fill non-contiguous area of your work area with the currently selected color. Otherwise this tool works the same way as Fill contiguous area.
Clear Contiguous Area
Use Clear Contiguous Area tool to cancel the fill in contiguous area. It clears any area of work area that is a single color. If you use this tool on an area that's not entirely surrounded by other colors, it will clear areas that are the same color as the original area. Before you use this tool,
you might want to choose the cross type (see below). Use left mouse button to clear the chosen cross type, use right mouse button to clear the complete cross.
Clear Non-contiguous Area
Use Clear Non-contiguous Area tool to cancel the fill in non-contiguous area. Otherwise this tool works the same way as Clear Contiguous Area.
Back Stitch
Use Back Stitch tool to paint straight back stitch lines. Press the mouse button and drag the Back Stitch tool across work area. Release the mouse button when you've finished drawing the line. If you want the lines you paint to be limited to 45-degree increments, hold down Shift as you draw the line. With Shift down, you can paint only a horizontal or vertical line or a line on a 45-degree angle. Before you use this tool, you might want to choose
the strands of thread to use for outline (see below). Use left mouse button to paint with cross color 1, use right mouse button to paint with cross color 2.
Back Stitch 1/2
Use Back Stitch 1/2 tool to paint straight back stitch lines. Use this tool if you want to position back stitches to a half stitch position. Otherwise this tool works the same way as Back Stitch.
Back Stitch Draw
Use Back Stitch Draw tool to draw back stitch lines by freehand. Press the mouse button and drag the Back Stitch Draw tool across work area. Release the mouse button when you finish sketching. Before you use this tool, you might want to choose the strands of thread to use for outline (see below). Use left mouse button to paint with cross color 1, use right mouse button to paint with cross color 2.
Back Stitch Draw 1/2
Use Back Stitch Draw 1/2 tool to draw back stitch lines by freehand. Use this tool if you want to position back stitches to a half stitch position. Otherwise this tool works the same way as Back Stitch Draw.
Erase Back Stitch
Use Erase Back Stitch tool to delete the back stitch line. Move mouse pointer over the back stitch line. Then click either left or right mouse button anywhere over the length of back stitch line to delete it. Depress Shift key while clicking to delete all back stitch lines having the same color as the chosen one. Depress Alt key while clicking to delete all back stitch lines connected with the chosen one. Depress Shift and Alt keys simultaneously while clicking to delete all back stitch lines.
Back Stitch Color
Use Back Stitch Color tool to change the color of back stitch line. Move mouse pointer over the back stitch line. Then click either left or right mouse button anywhere over the length of back stitch line to change its color to either cross color 1 or cross color 2. Depress Shift key while clicking to change color of all back stitch lines having the same color as the chosen one. Depress Alt key while clicking to change colors of all back stitch lines connected with the chosen one. Depress Shift and Alt keys simultaneously while clicking to change color of all back stitch lines.
Get Back Stitch Layers
Use Get Back Stitch Layers tool to get the number of strands of thread to use for back stitch line. Move mouse pointer over the back stitch line. Then click either left or right mouse button anywhere over the length of back stitch line to get the number of strands of thread (see below).
Set Back Stitch Layers
Use Set Back Stitch Layers tool to set the number of strands of thread to use for back stitch line. Move mouse pointer over the back stitch line. Then click either left or right mouse button anywhere over the length of back stitch line to change its number of strands of thread setting. Depress Shift key while clicking to change the setting of all back stitch lines having the same color as the chosen one. Depress Alt key while clicking to change the setting of all back stitch lines connected with the chosen one. Depress Shift and Alt keys simultaneously while clicking to change the setting of all back stitch lines.
Get Back Stitch Division Option
Use Get Back Stitch Division Option tool to get the status of thread division option to use for back stitch line. Move mouse pointer over the back stitch line. Then click either left or right mouse button anywhere over the length of back stitch line to get the status of back stitch division option (see below).
Set Back Stitch Division Option
Use Set Back Stitch Division Option tool to set the division option to use for back stitch line. Move mouse pointer over the back stitch line. Then click either left or right mouse button anywhere over the length of back stitch line to change its thread division setting. Depress Shift key while clicking to change the setting of all back stitch lines having the same color as the chosen one. Depress Alt key while clicking to change the setting of all back stitch lines connected with the chosen one. Depress Shift and Alt keys simultaneously while clicking to change the setting of all back stitch lines.
Insert French Knot
Use Insert French Knot tool to insert French knots in work area. Use left mouse button to insert French knots of cross color 1, use right mouse button to insert French knots of cross color 2. Before you use this tool, you might want to choose the Diameter and Thickness of French knot (see below). Depress the Alt key while clicking left or right mouse button to remove the French Knot.
Erase French Knot
Use Erase French Knot tool to remove French knots from work area. Move mouse pointer to the center of French knot and click left or right mouse button to remove it.
Get French Knot Diameter
Use Get French Knot Diameter tool to read the diameter setting of French knot located on the work area. Move mouse pointer to the center of French knot. Then click either left or right mouse button to read its diameter setting (see below).
Set French Knot Diameter
Use Set French Knot Diameter tool to set the diameter setting of French knot located on the work area. Move mouse pointer to the center of French knot. Then click either left or right mouse button to change its diameter setting. Depress Shift key while clicking to change the setting of all French knots having the same color as the chosen one. Depress Shift and Alt keys simultaneously while clicking to change the setting of all French knots.
Get French Knot Thickness
Use Get French Knot Thickness tool to read the thickness setting of French knot located on the work area. Move mouse pointer to the center of French knot. Then click either left or right mouse button to read its thickness setting (see below).
Set French Knot Thickness
Use Set French Knot Thickness tool to set the thickness setting of French knot located on the work area. Move mouse pointer to the center of French knot. Then click either left or right mouse button to change its thickness setting. Depress Shift key while clicking to change the setting of all French knots having the same color as the chosen one. Depress Shift and Alt keys simultaneously while clicking to change the setting of all French knots.
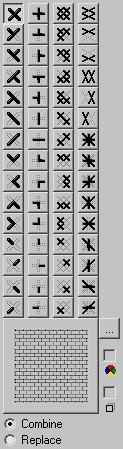
Cross Type
The cross type control is located on the right side of the screen. The first column contains normal cross and its parts: Full cross, 3/4 cross, Half cross or Quarter cross. If you choose e.g. 3/4 cross stitch type, this stitch can be combined with another Quarter stitch of different color. The second column contains upright cross and its parts, the third column contains mini crosses and the fourth column contains horizontal, vertical and double crosses. Below the columns there is button with current fill pattern, the list of available pre-defined patterns will appear after clicking on the ... button.
The Combine and Replace options
determine how the Cross Stitch will handle the situation if you put two crosses into the same cell in work area.
For example, if you put normal "X" cross and upright "+" cross into the same cell,
then in case the Combine is ON the result will be a double-cross,
and in case the Replace is ON the result will be an upright "+" cross.
The Keep Pattern Colors setting determines whether the colors are kept or not in the fill pattern. It has meaning only for multi-color fill patterns. In case the colors are kept, the Cross Stitch will ignore the currently selected color, and it will use the colors defined in the pattern. In case this setting is off, Cross Stitch will replace all colors in pattern with currently selected color.
The Keep Pattern Layers setting determines whether the number of layers is kept or not in the fill pattern. This affects the layer settings of regular, horizontal, vertical and mini crosses, as well as back stitch lines. It has meaning only for patterns with different layer settings. In case the layer settings are kept, the Cross Stitch will ignore the currently selected layer setting, and it will use the layer settings defined in the pattern. In case this setting is off, Cross Stitch will replace all layer settings in pattern with currently selected layer settings (see below).
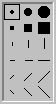
Pen Width, Eraser Tool Width, Smooth Tool Width
The pen width control is located on the right side of screen below the color palette. This control is not always visible, only when particular tools are used (Pencil, Line, etc.). Use this control to choose the pen width.
The brush type control is located on the right side of screen below the color palette.
This control is not always visible, only when particular tools are used (Brush, Air-brush, etc.).
Use this control to choose the brush type.
Other Settings
Fill properties.
Click this button to display a dialog box, in which you can change the fill properties, such as filter and gradient.
Cross width in millimeters.
Left click on the number to increase it, right click on the number to decrease it. Click on the icon to display a dialog box with preset values.
Cross height in millimeters.
Left click on the number to increase it, right click on the number to decrease it. Click on the icon to display a dialog box with preset values.
Cross layers:
Number of threads to use for regular, mini, horizontal and vertical crosses. This must be even number. Left click on the number to increase it, right click on the number to decrease it. Click on the icon to display a dialog box with preset values.
Number of threads to use for outlines and back stitch lines.
Left click on the number to increase it, right click on the number to decrease it. Click on the icon to display a dialog box with preset values.
Back stitch division option.
If ON, the outlines and back stitch lines are divided along the cross stitch grid. If OFF, the outlines and back stitch lines are not divided - use it for animal whiskers, etc.
Thickness of French knots.
Left click on the number to increase it, right click on the number to decrease it. Click on the icon to display a dialog box with preset values.
Diameter of French knots.
Left click on the number to increase it, right click on the number to decrease it. Click on the icon to display a dialog box with preset values.
Add trimming codes to the design.
If ON, the trimming codes are inserted into the cross stitch design.
Add tie on/off stitches to the design.
If ON, the tie on/off stitches are inserted to the cross stitch design.
Add outline to the design.
If ON, the outlines are created automatically when the cross stitch design is compiled into stitches.
Add outline to each color in the design.
If ON, the outlines around each color are created automatically when the cross stitch design is compiled into stitches.
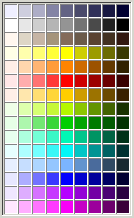
Palette
This palette contains available colors. Double-click on the color to change the color in the palette. Right click on the color to display the popup menu, which allows to choose color from thread catalogs. You can also drag the color from this palette to the right side of screen and drop it to the boxes for Cross color 1, Cross color 2, Outline color or Background color (see below).
Choose cross color 1.
Left mouse button will draw with this color (see Tools above). Double-click on the box to change the color. Right click on the box to display a popup menu - this allows to choose the color from the thread catalogs. You can also drag the color from Color Palette and drop it on the box to set the color.
Choose cross color 2.
Right mouse button will draw with this color (see Tools above). Double-click on the box to change the color. Right click on the box to display a popup menu - this allows to choose the color from the thread catalogs. You can also drag the color from Color Palette and drop it on the box to set the color.
Choose outline color.
This color will be used for outlines in case the outlines are ON. In such a case the outlines will be created automatically when compiling cross stitch design. Double-click on the box to change the color. Right click on the box to display a popup menu - this allows to choose the color from the thread catalogs. You can also drag the color from Color Palette and drop it on the box to set the color.
Choose background color (transparent).
This is the color of the Work Area. Double-click on the box to change the color. Right click on the box to display a popup menu - this allows to choose the color from the thread catalogs. You can also drag the color from Color Palette and drop it on the box to set the color.
Specify the tolerance setting for
Magic Wand tool (see Tools above). Bigger number means bigger tolerance. Right click on the box to display the dialog box with preset values.
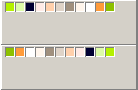
Panels
These panels contain the colors used for crosses (top panel)
and colors used for back stitch lines and French knots (bottom panel).
When you right click on the color on this panel, a popup menu will appear, containing several commands,
allowing you to change color, show/hide color, delete color, change sewing order of colors, etc.