Insert Text (Editor)
Basic lettering features:
- Characters scalable in large scale (4,5 mm - 8 cm for "a").
- Various underlays (center walk, edge walk, zig-zag).
- Automatic and manual kerning of characters.
- Various types of letters connections (nearest point, floating stitch).
- Automatic tie-ups before and after floating stitches.
- Automatic simplification of serifs for small-size letters.
- Automatic parameters and underlays for various sizes of letters.
- Possibility of global change of text parameters or individual change of single letters parameters.
- Arching of text. Text can be placed on any of 3 predefined paths (circle, line, vawe) with variable parameters.
- Editing of spaces between letters, size of path and text, type of underlay.
Alphabets are optional plug-in modules for Embird Software. Their price is not included in Embird Software registration fee. If you want to use a plug-in, you must register it first (see also Registration). You can use unregistered plug-ins for testing, but only few Objects (letters or designs) in each plug-in are enabled for this purpose.
When you choose Insert Text command, a dialog box appears. It contains three tabs, which enable you to enter the text, set its properties and specify its layout. Each tab is explained below. Note that in most cases all you have to do is to type in the text and specify its height (size).
Insert Tab
Choose plug-in name (alphabet) you want to use in Plug-in box. All Objects (letters, designs) contained in chosen plug-in will be shown in Objects box. Type the text you want to insert into Text box, or double click on Object icon in Objects box. Choose type of connection in Connection type box. There are three types available:
- Floating stitches - letters are connected by floating stitches, each letter is inserted into Editor as an independent Object, so that you can manipulate it later, e.g. you can move it.
- Floating stitches (solid) - the same as above, but whole text is inserted into Editor as a single Object, so that you must split it if you want to manipulate letters independently.
- Running stitches (nearest point) - letters are connected by running stitches at their nearest points. The length of connections is minimal and so there is no need trim them out by hand after the embroidery is finished. This is intented mostly for small-size letters.
Floating stitches connection type can be also combined with Nearest point option.
Properties Tab
Specify width and/or height of text in Size box. You can specify it either absolutely or relatively. Uncheck Keep ratio box if you want to specify the width and height independently.
At this tab, you can also set parameters of text being inserted. This relates to density of cover stitches, type of underlay, pull compensation, start/end offset, broadening, random broadening, fill pattern, auto shortening, gaps among letters etc. See figures below to find out the meaning of particular parameter. You can set either global parameters for whole text or individual parameters for each letter. Choose this option in Use box.
In most cases, you will use global parameters, which are adjusted automatically for various sizes of letters. Only seldom you will have to change these parameters, e.g. in case you want to increase the density of cover stitches when you are embroidering on heavy material etc.
Sometimes it may be neccessary to adjust parameters individually for every letter, e.g. if you want to increase particular gap between two letters, and all other gaps should remain the same. You can edit individual properties at the right side of this tab.
Layout Tab
Check the layout of the text being inserted at this tab. You can place the text either on a line, circle or wave - just choose the proper curve in Baseline box. You can specify width and/or height of baseline too. Move the text along the baseline by adjusting Start point value. Place text on the other side of curve if you like, e.g. inside or outside the circle. You can increase or decrease gaps among letters. You can also change the envelope of lettering, either by choosing one from the list or create brand new envelope. When you create lettering (either using Embird alphabet plug-ins, or Font Engine plug-in), please note that there are several points shown on layout area, allowing you the following:
- Use red points to move the character along the baseline. If you depress Ctrl key it will move only selected character, otherwise all characters placed after selected character will move.
- Use green points to rotate the character. If you depress Ctrl key, the angle will change by 15 degrees. If you depress Alt key, the angle will be set to 0 degrees.
- Use teal points to resize the character, either horizontally or vertically. If you depress Ctrl key, the size will change in larger steps. If you depress Alt key, the aspect ratio of width and height will be kept.
- Use purple points to skew or
mirror the character, either horizontally or vertically. If you depress Ctrl key, the skew will
change in larger steps. If you depress Alt key, the selected letter will be mirrored.
If you depress Shift key while moving the point, the operation will be applied to all characters. Undo/Redo/Reset operations are available for changes in layout - use the buttons located below layout area. - You can save all the settings to hard disk using the Save lettering project button (located at the left side of OK button on each tab). Use the Open lettering project button to load the settings.
- Note: It is best to set the proper size of letters in dialog box described above at Properties tab. Avoid changes of size in Editor using the outline box because this will not adjust density, start/end offsets, lengths of underlay stitches etc.
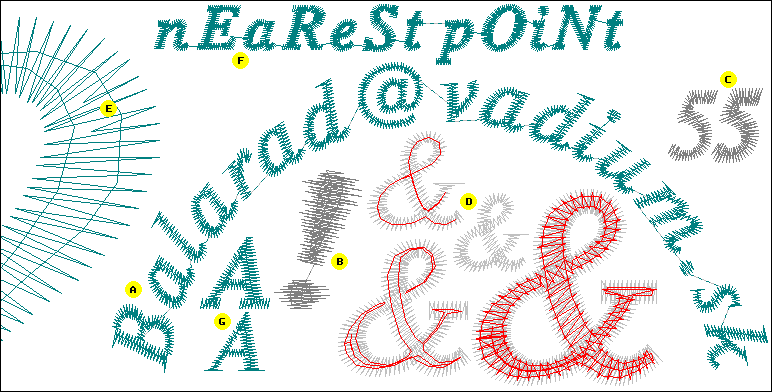
Fig. 1 Properties and Layout
a) Arching of text
b) Random broadening
c) Pull compensation
d) Various types of underlay
e) Auto shortening of stitches in curves
f) Nearest point connections
g) Automatic simplification of serifs on small characters

Fig. 2 Fill Patterns
a) None
b) Fill 1
c) Fill 2
d) Strips
e) Bricks 1
f) Bricks 2
g) Pavement
h) Lines