
Navigate
Products
Download
eShop
Upgrade
About
Training
Support

Navigate
Products
Download
eShop
Upgrade
About
Training
Support
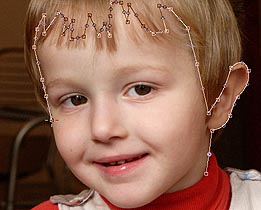
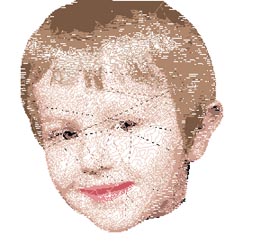
Sfumato generates stitches from picture (photo) imported into background of the work area. User draws boundaries of areas that will be turned into stitches and assigns proper parameters to each area (object).
Resolution of the raster picture determines size of the finished design. The ratio between picture units (pixels) and design size is 10 pixels/ 1 millimeter. This means that design with 10 centimeters (3.94 inches) height should have 1000 pixels. Each time the sfumato stitches are generated, the underlying picture is used. Therefore, sfumato object cannot be resized without resizing also the underlying raster picture.
1. ![]() Use the Sfumato Tool to draw the area you want to
fill with stitches. Each area can have up to 5 shades of the 'basic
color'. In this example, draw the face area as a first object. Make the
face object so that there is an overlay into hair. Face will be filled
with shades of 'skin color'.
Use the Sfumato Tool to draw the area you want to
fill with stitches. Each area can have up to 5 shades of the 'basic
color'. In this example, draw the face area as a first object. Make the
face object so that there is an overlay into hair. Face will be filled
with shades of 'skin color'.
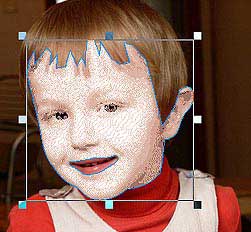
We want to make mouth in other color.
Therefore, use the ![]() Opening Tool to cut off the mouth area.
Opening Tool to cut off the mouth area.
Please note: besides Openings, Sfumato objects
can also have Carvings. ![]() Carvings are lines or curves that are drawn immediately after the Sfumato
object. They can be used to emphasize some hardly visible edges in the
Sfumato object.
Carvings are lines or curves that are drawn immediately after the Sfumato
object. They can be used to emphasize some hardly visible edges in the
Sfumato object.
2. Select the face and click right mouse button on it. Choose 'Parameters' command from the pop-up menu. Use the eye dropper tool to pick 'skin' color from the photo as so called 'basic color' of the object. Program automatically generates 5 shades of this color. Decrease the contrast of shades with use of the Contrast control.
Please note: use the preview buttons to see the influence of adjusted parameters on the Sfumato object
![]() Stitches Preview shows approximate look of the object.
Stitches Preview shows approximate look of the object.
![]() Thread Shades Layout helps user to adjust color thresholds
and color masks balance accurately.
Thread Shades Layout helps user to adjust color thresholds
and color masks balance accurately.
3. Select the mouth opening in the Parts Inspector window and use the main menu 'Convert>Create Fill from Opening' command to create filled Mouth object. Adjust parameters of the mouth object. Because it is a very small object, it is not necessary to use 5 color shades for it. Disable 3 or 4 shades by clicking on respective color boxes.
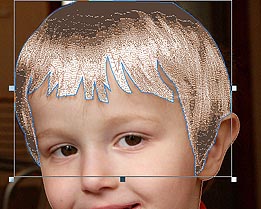
4. Create the last area, hair, in the same way as face and pick appropriate color for its fill with use of the Parameters window. Disable two shades, because 3 shades are enough for this object. Click on Parameters button in the top left corner and check 'Show More Parameters' to access advanced controls. Adjust 'Shades Threshold' (value -41) to give the hair better shades balance.
5. Generate stitches for all three objects. The portrait is finished. Save design into Studio *.EOF file. Use the main menu 'Design > Compile and Put into Embird Editor' function to place design into Editor for saving in desired machine embroidery format. If you are not registered user of Sfumato Stitch, this command is disabled.