Points Editing Mode (Editor)
![]()
Click on this button to enter Points Editing Mode. This mode allows you to move, insert or delete a single point or several selected points. You can also change the type of chosen point (e.g. running stitch to floating stitch). Aligning stitches can be added to each part of split design to simplify the process of hooping. The design can be split on any chosen point.
Depress left mouse button in Working Area and drag the mouse to select the area of editing.
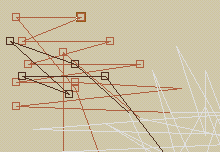
Inside of the selection rectangle, the stitch points are shown as squares that are used as handles,
while the stitch points lying outside of the rectangle will be drawn in a ghost color. On the illustration,
there are 16 stitch points lying within the area of editing.
To select a point within the area of editing,
click the left mouse button on its handle square. The square indicating the selected point changes to a
thick lined square (there is only 1 selected point on the illustration). If you want to add another point to the selection,
depress SHIFT key while clicking on the handle square. Another possibility of multi-selection is while depressing SHIFT key,
also depress the left mouse button and drag the mouse to create a multi-selection rectangle.
All visible points lying within this rectangle will be selected. If you want to select a point lying under some other point,
depress ALT key while clicking on its handle square. The number of selected points is displayed at
the bottom of Objects Order Bar.
To move a point, depress the left mouse button on its handle square and drag the mouse. Release left mouse button when the point is on the right position. You can move several selected points too - select the points first, then depress left mouse button while the mouse cursor is placed over some of selected points and drag the mouse. Mouse co-ordinates are displayed at the bottom of Objects Order Bar.
If you want to add a new point, there are two possibilities: The first one is to use the command in popup menu (see below). The second one allows you to add the new point freehand. Select a single point, after which you want to add the new point. Move the mouse cursor to the desired position, depress the CTRL key and click left mouse button. It can be very helpful to know the stitch direction here, so that you can find and select the right stitch point. To visualize the stitch direction, switch on the Stitch Direction option in View menu.
The popup menu is displayed when you click on selected point with right mouse button.